Come, let's chat within a Glide app
How to build Comments & Chat features in Glide

Introduction
In any web app, or mobile app, or a website, chat has become a default feature. Usually when we think of chat within these, most of the time it's to get in touch with the support team. On websites, it's to chat with the sales team to ask questions about a product or pricing.
Larger organizations/enterprises use tools like Slack, Microsoft Teams for internal communication. How nice it'd be if team members could chat within their internal portal without having to sign up for another tool? Especially in small and medium businesses where the teams are close knit. It also makes a lot of sense when the teams are physically located in different places.
Glide, as we all know is a No Code tool primarily meant to build internal apps for different type of businesses. Few examples are, building a Customer Relationship Management (CRM) systems for a Digital marketing agency, Order Management (ORM) system for a factory, Event Management applications for those who host, conduct events, Applicant tracking system, the list just goes on. In order to read more on use cases and case studies, check out Glide's Customer stories page.
All these apps have few things in common, one among them is communication between two different entities. Communication can happen between a Client and the Service Provider. It can happen between a Manager and their team members. It can happen between an applicant and the portal owner. Most of the time these written communication is enabled through emails. Another common method is to embed a chat interface using tools like Intercom.
What if there is a native option to build without using a third party tool? There are quite some advantages. Number one would be "Your data will be your data", Number two would be "To reduce the number of integration with other tools", Number three would be "To have complete control over which modules can have the aspect of chat".
In this post, I explore Glide's comments & chat components in detail. How to use them, what would be the tables required, what to do if it needs to be a private chat versus a common comments section on a public page and more.
Come, let's glide ✨ and chat too 💬
A brief background about Skill Sprout
In a couple of my previous posts where I wrote about different features and aspects of Glide, I used the Skill Sprout app that I built, a minified version of Udemy.
It's a super simple app that has Instructors, Students, Courses, Feedback as different entities. Check this post where I show how to bring up the basic version of the app.
In order to build the comments and chat features, I decided to continue building on top of the Skill Sprout app itself. Please be sure to check my previous posts to see the features that have been added so far.
Just to give a quick summary of what the app does, it is a platform where Instructors can sign up to teach digital courses, Students can sign up to learn courses. All this while I did not add the concept of User Profile. Let's add it now as the private chat feature is based on the signed in user.
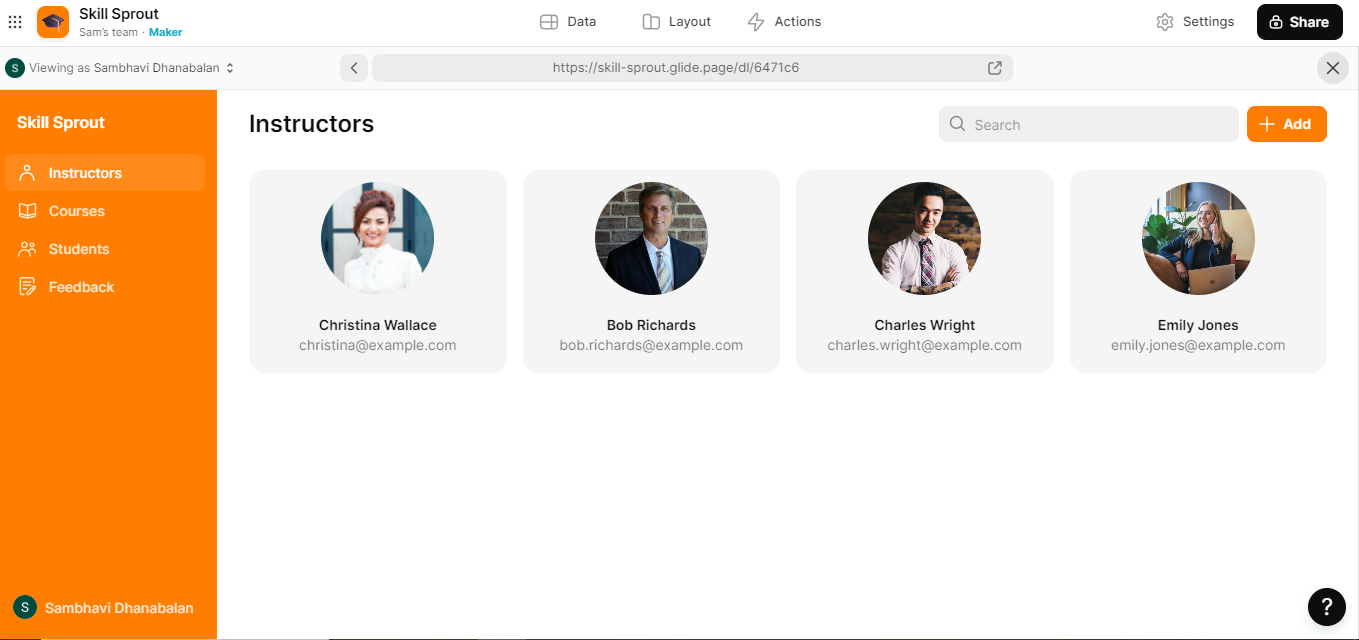
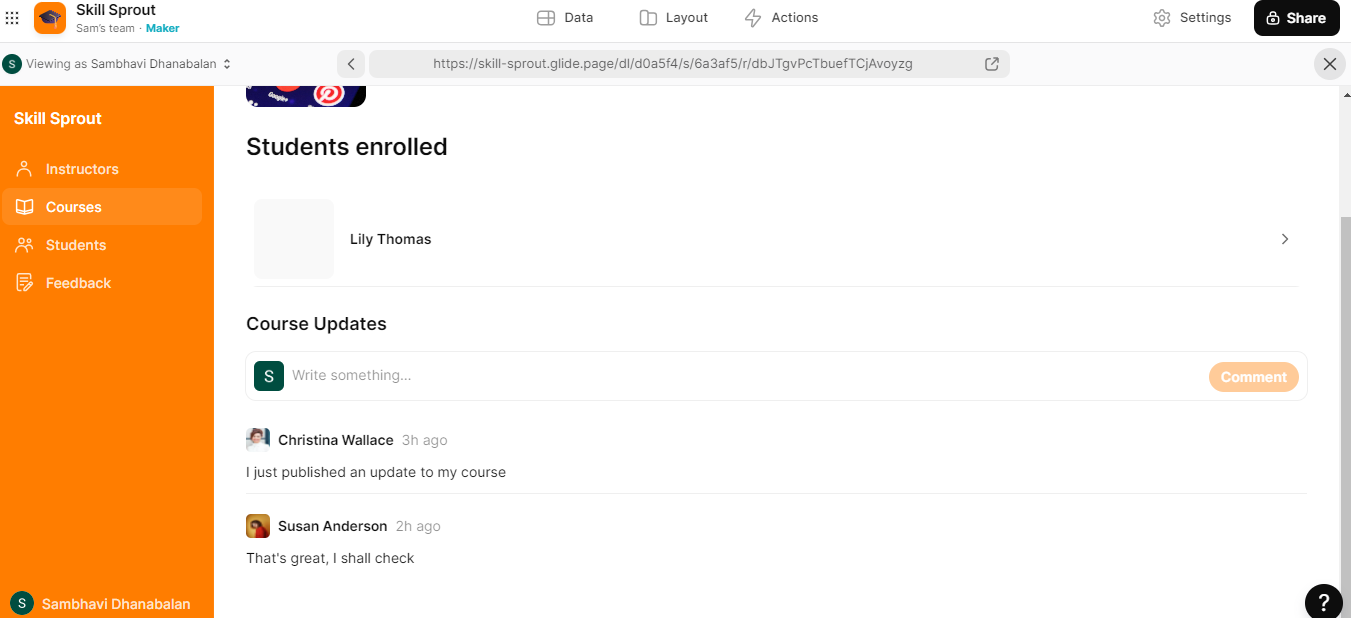
Here is a quick snapshot of how the app looks like:
Here is what I plan to build as part of this post:
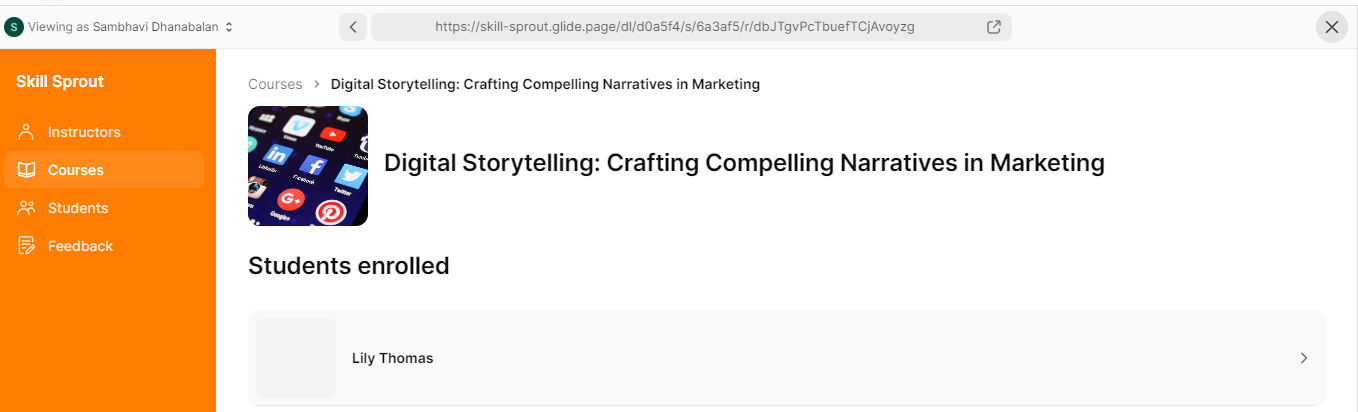
A "Course Updates" section where we use Comments component. This will be public in nature. In the sense, everyone can view all the updates and associated remarks made. Below is the Courses screen. To start with, we shall add a Comments component in this page itself.
A Private chat between an Instructor and a Student. In order to implement this, let's use the Chat component.
Let's start to build!
Comments & Chat feature in Glide
There are various components in Glide, one for each scenario. Text entry, Choices, Checkbox, Image picker, Audio recorder, Collections to name a few.
Collections is slightly different from the rest, in the sense it is used when there are multiple records associated with an entity. There are different options in which items of a collection can be displayed. List, Cards, Grid, Table, Kanban to name a few. All these are used to display information. Comments and Chat are also a Collection option, but these two types can take text as input, not just display text.
Technically, comments and chat are of the same type. Just that, the way information gets displayed is different. In comments, there is no hierarchy, it's linear in nature. Whereas with Chat, the look and feel is more like a conversation between two people.
When I started to read about Comments and Chat in Glide, I overlooked one aspect, the one where comments/chat had to be tied to an entity i.e. what are we commenting about. Somehow I never thought about it that way. I always imagined comments to be a common thing. But when I read in detail and started to implement, it made a lot of sense.
Thanks to Robert Petitto, I learned all about Comments and Chat from one of his YouTube videos
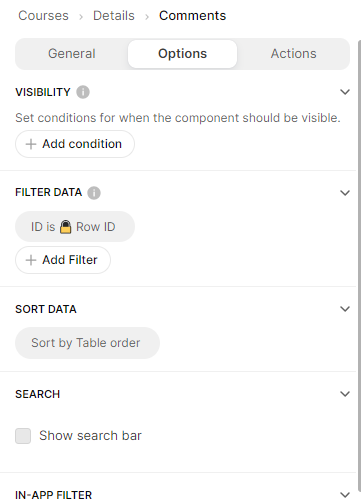
Let's build the Comments section
The first step is to add the required tables and relations. In this post, I'm going to add a Course Updates section where the Instructor will add about the updates they made to a course, more like an announcement. And students ask their questions, or acknowledge them in return. All these in a common forum.
Step 1 is to design a table to hold the actual comments/messages. I named the table as "Course Update Comments". Here is the table structure:
ID - This is the Row ID of the entity with which this message is related to. In our case, it will be one of the Row ID in Courses table
Timestamp - Date and Time when the comment was made
Owner - Email of the person who made the comment
User Name - Name of the person who made the comment
User Photo - Photo of the person who made the comment
Message - The actual comment itself
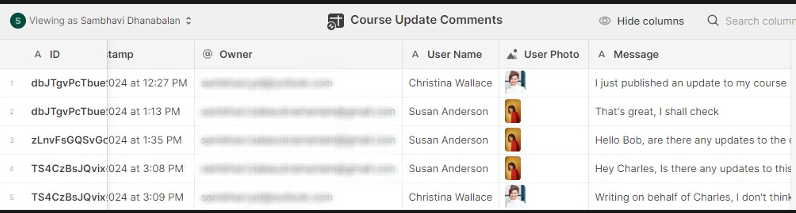
Here is a snapshot with a few sample records

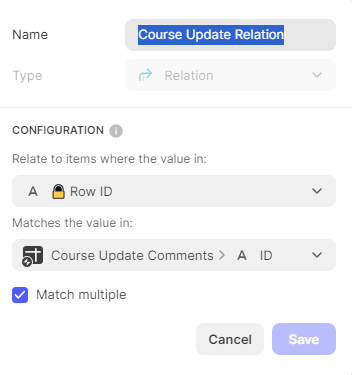
Step 2 is to define the relation between Courses table and the newly created Course Update Comments table.
We add a column of type Relation in Courses table. We relate the Row ID of Courses with ID column of the other table. Since a course can have multiple comments we select match multiple option. This is how it looks 👇
Step 3 is to define a Comments collection in the Layout section. In the Courses screen, clicking on a course will take to it's detail page. I added the component there. This is how it looks 👇
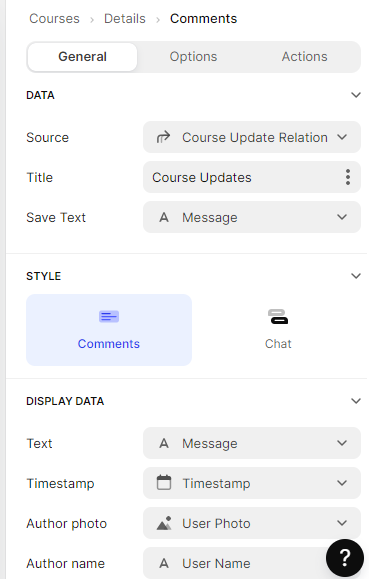
Step 4 is to define the properties that need to be set to this Collections component. Since we are defining the collection in the Course details page, we choose the newly created relation as the data source.
Key thing to make note of here is the mapping of Message column to Save Text.
Display Data is the set of information that will be displayed on the screen as soon as a user enters a comment. These are columns that we defined in the Course Update Comments table.
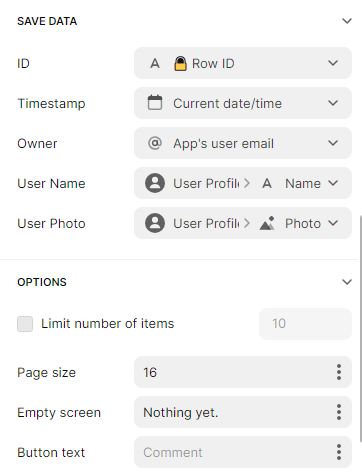
The final section under General tab is the Save Data section. We do the mapping of front end - back end in this section. In other words, where should the captured information be saved is being defined here.
Shall we see it in action? Here is a short video that I recorded where I add comments in multiple courses. This is how the table looks like now with the new messages added.
Isn't it cool? It's super easy to create such a component using the Comments option. One can think of using this feature in multiple use cases 🤩
Let's now build the Chat feature
Alright, let's now move on to implementing the chat feature to our Skill Sprout app.
Chat component is quite similar to Comments in terms of table design except for two key differences.
The table that holds the chat messages will have two owners, one to denote the Sender and the other to denote the Receiver of the message
These two columns should be made row owners, so that the chat messages are visible only to relevant people and not to all
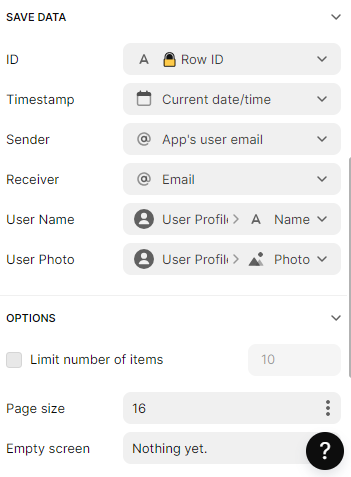
Step 1 is to create a table named Student Instructor Chat with the following columns:
ID - This is the auto generated Row ID of the table
Timestamp - Date and Time when the comment was made
Sender - Email of the person who sent the message
Receiver - Email of the person to whom the message was sent
User Name - Name of the person who sent the message
User Photo - Photo of the person who sent the message
Message - The actual chat message itself
Do not forget to make the Sender and Receiver columns to be Row Owners.
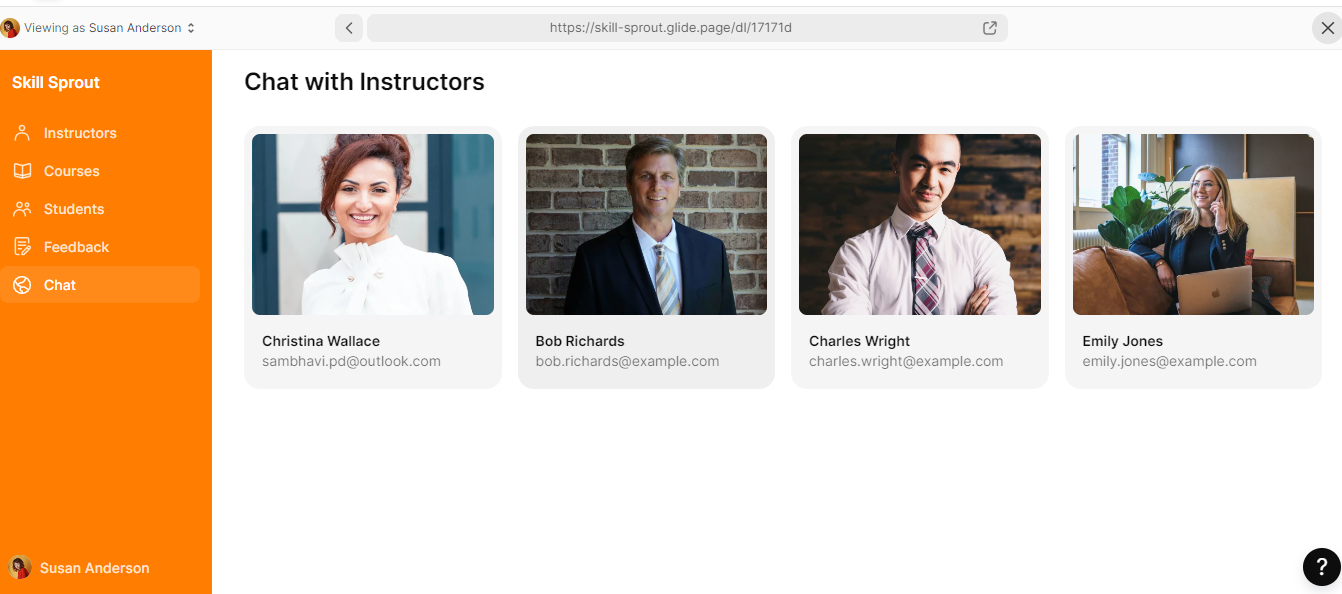
Step 2 is to add a menu named Chat. I added two collections, 1 mapped to Instructors, and the other mapped to Students. When the Instructor is signed in, they will see the list of Students. Likewise, when the Student is signed in, they will only see the list of Instructors.
Here is a view when a Student has signed in:
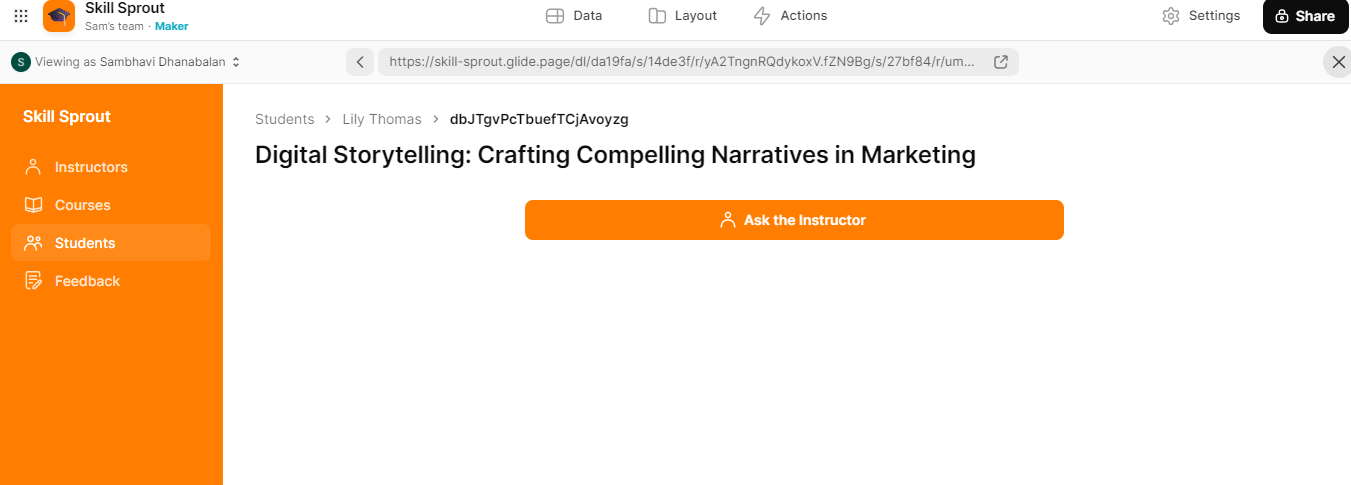
Step 3 is to add a Chat component on click of either an Instructor or Student. Map the data source to the newly created Student Instructor Chat table. See below for other properties 👇
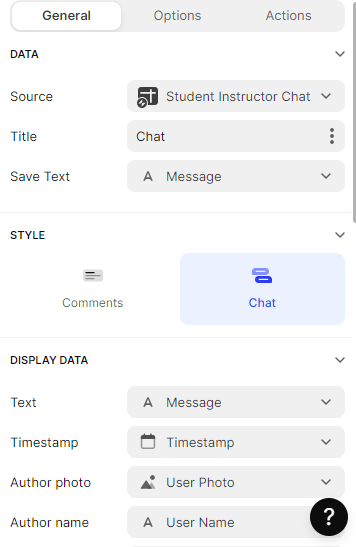
All the properties in Chat flow are quite similar to what was set in the Comments flow. Just that, in Save Data section we have two email columns instead of one. As per this flow, the Receiver is nothing but the email of the person who was chosen on the Chat screen. Otherwise, all other mappings are the same.
Time to see in action, I've demonstrated a chat between Christina (Instructor) and Susan (Student). Here is a short video of the same!
Conclusion
In this post, we saw how to make use of the Comments and Chat type collection in a Glide app. Trust me, it is extremely powerful to have an in-house chat feature, it increases the productivity of workflows.
In a future post, I plan to write how to make use of AI features in a Glide chat.
Until then, ciao 👋
If at all you need any help using Glide, or planning to build a tool for your business, I'm just a call away!
References
Thank you Robert for this wonderful video. Here is where I learned all about Chat and Comments!