Add auto address feature to your Glide App
Let's use Radar integration to perform this action

Introduction
In my previous post, we scratched the surface on Glide actions. We took an example of performing multiple actions on form submit.
Glide supports a number of integrations to perform a broad variety of actions. The action can be sending an email, messaging, fetching analytics data, making payments, finding information about businesses, designing full fledged workflows, calendars and much more.
Here is the complete list of integrations that Glide supports as of today.
In this post, I walk you through integrating Radar, an all in one location platform with Glide.
What is Radar?
Radar is a location platform that provides capabilities of geo-fencing, trip tracking, live ETAs, Point of Interest datasets, GPS spoofing, an alternative to Google Maps and much more in the world of location related APIs.
The use cases that these APIs can solve is numerous. When it comes to Glide, Radar provides a handful of features that can be integrated. They are:
Track user location once
Get geo-coordinates for an address
Get an address from geo-coordinates
Complete a partial or unformatted address
Get the distance between two addresses
In this post, let's look how to implement an auto-completion of address column by integrating Radar and Glide.
Integrate Radar with Glide
In order to perform any integration, one needs to open an app in Glide. Let's work on the Events app that we developed as part of our earlier posts.
In our Events app, we have the Event screen that has a column Event Location which is used to hold the physical address where the Event is going to be held.
From an usability aspect, it will be a good idea to add an auto completion of address for the Event Location field. Let's now see the steps to perform the same.
Sign up with Radar for a free plan. Navigate to the dashboard where you will find your Live publishable (client) key. Make a note of that.
Sign in to Glide if you already have, else Sign up as a new user.
💡To proceed further, make sure you are on a starter planClick on the Settings tab on top right and choose Integrations and scroll down to find Radar.
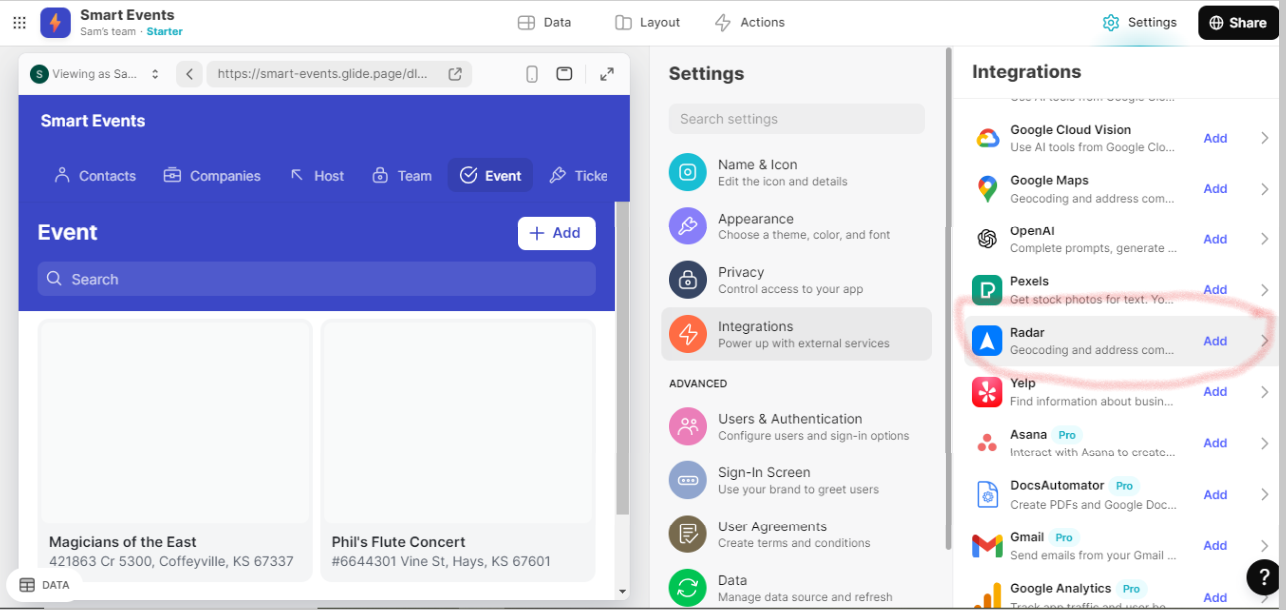
Click on Radar and then add it to app.

Paste Radar's Live publishable key in the given text box. That's it. Now we are good to implement auto-completion feature to our Glide app!
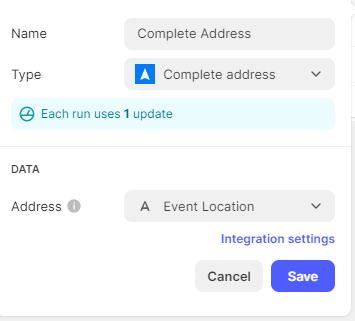
Let's now make changes to the table in order to hold the auto address information. In order to do that, add a column next to Event Location. I named it as Complete Address. In order to choose the data type, select Integrations - Radar - Complete Address. It looks like 👇
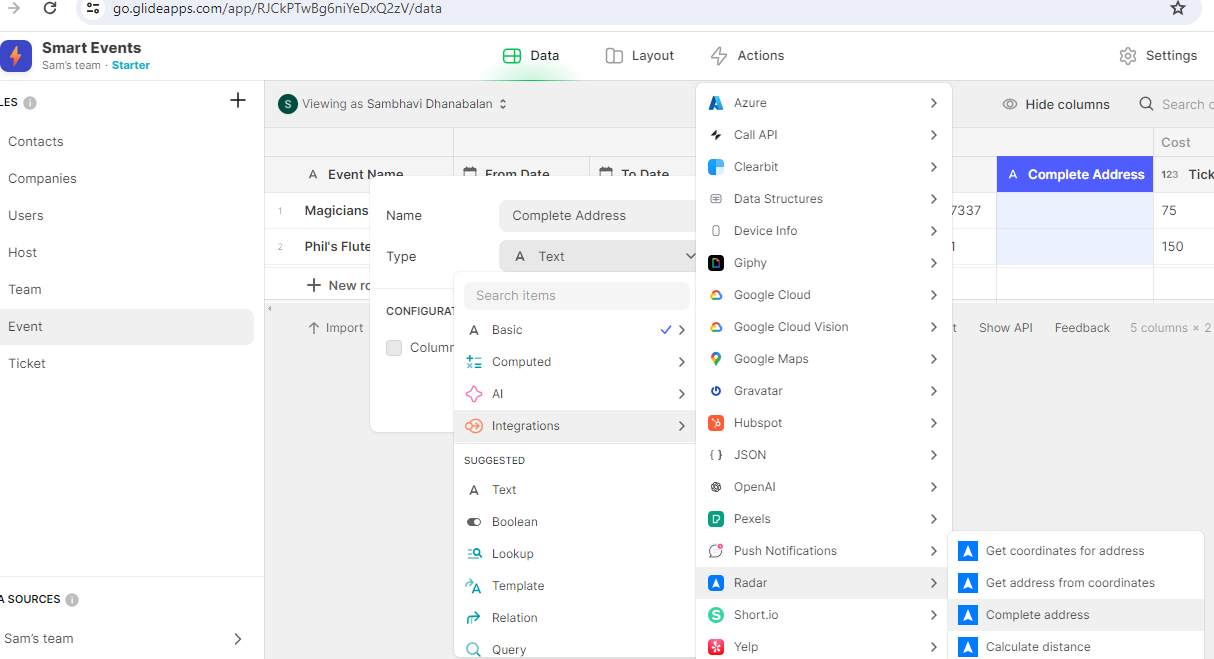
A small pop-up window appears next where we are required to map the column that should be taken as input for the complete address functionality. In our case, I choose the column Event Location.
 💡We create the Complete Address column in Events table, more to visualize the functionality from Glide Data pane itself. i.e. Even before you start to make changes in the User Interface, you will be able to see how it populates the address automatically.
The trick here is to create a duplicate of Events table. I call it the Event Helper. It should be a single row table. In order to keep it that way, delete all records from the newly created Event Helper table and add an empty row. Make sure to add the Complete Address column like how we added in the Events table.
The purpose of creating this single row helper table is that, on the add event screen, we need a place holder to store the values before actually submitting the form. We cannot use the Events table, the reason will be explained in the coming steps.
Let's now move to the User Interface. With a default form, the values get submitted only on clicking the Submit button. In order for the Complete Address to work, we need it to understand the value of the Event Location text box on the fly. In order to do that, we need to create a Custom form.
Let's now start to build a Custom screen. Let's click on the + sign in the Navigation pane and choose Custom screen.
Once we create a Custom screen, we clear off the components if any from the Components pane. We then add a Collection and map it to Events table. Immediately we see the list of Events along with a Search bar and a Add button. It looks quite similar to how it was in the default Event screen.
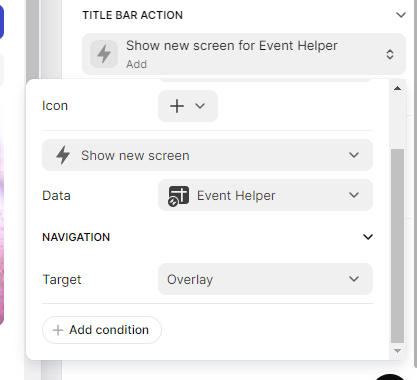
Now click on the Collection under the Components pane. On the right, you should see 3 tabs, General, Options and Actions. We do not change anything in General and Options tab.
In the actions tab, turn off the Add and Edit form actions. Click on the advanced action tab, in the title bar action Choose Show new screen for Event Helper.
We now move to designing the Add Event screen. Reason being, since we do not want the default form, we will create a manual form and map columns from the Event Helper table.
In order to do that, under Components pane on left bottom choose appropriate controls depending on the columns in Event Helper table. For eg., text entry for Event Name, Date Field for From Date and so on. On designing, it looks like 👇
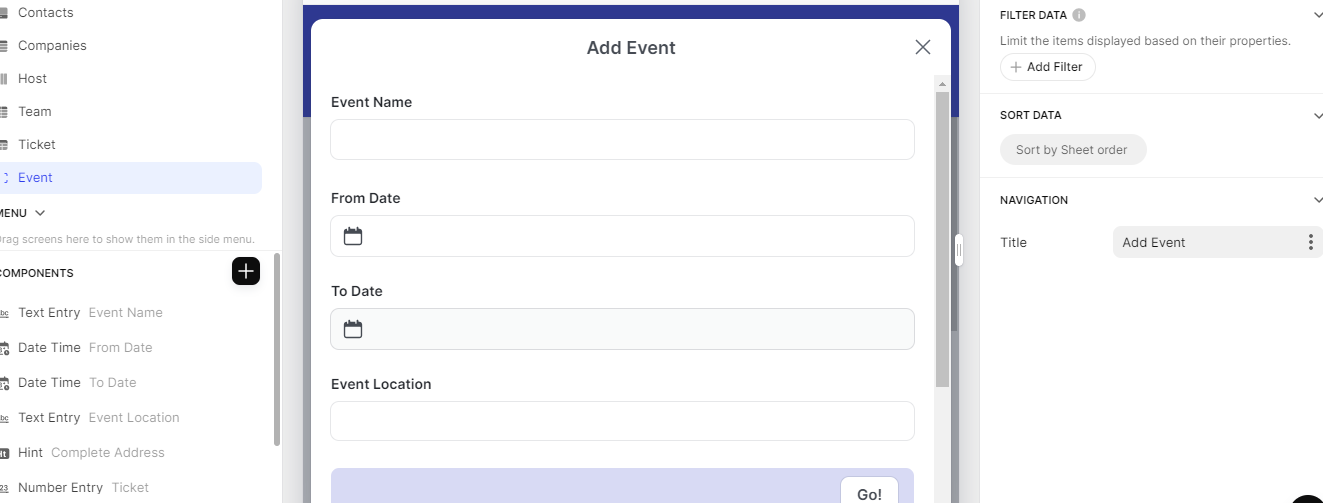
Note that we add a hint component below the Event Location text box. As the user starts to type an address, the hint box will be automatically populated with matching addresses. This is the only aspect that's new when compared to the original Event screen.
We need to set a few properties in the Hint component. Just remove the default text This is a hint that appears. In the actions tab, map the Complete address functionality. On performing the same, it looks like 👇
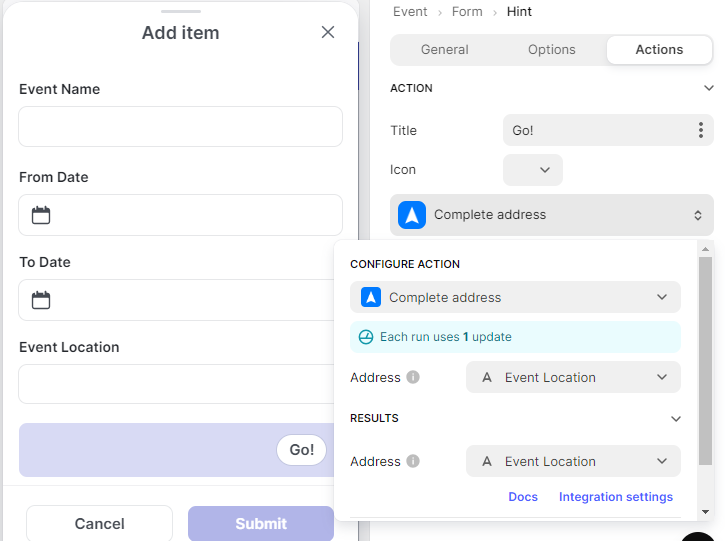
Make sure to map the Address column to Event Location as source and destination.
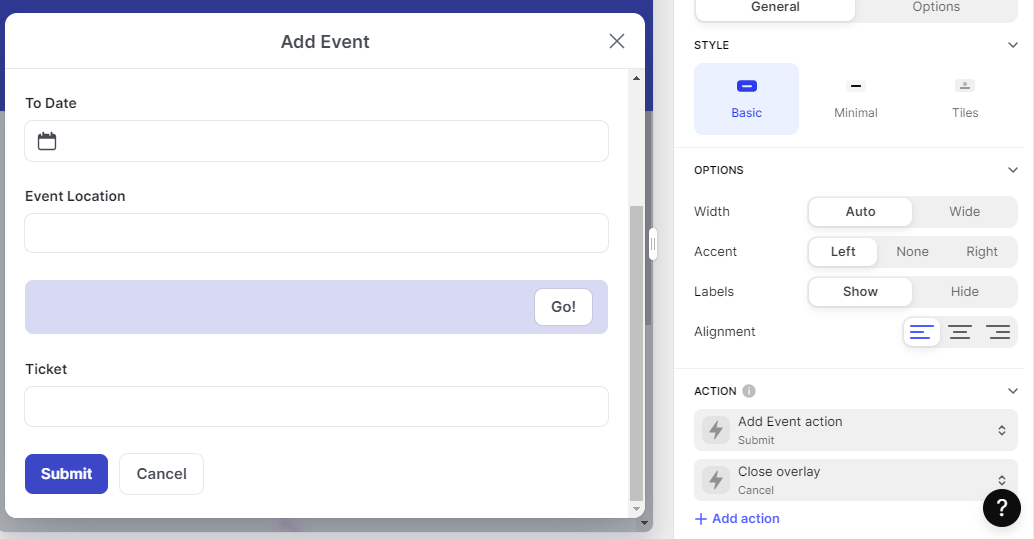
We are towards the last few steps to see it working 😉. When we designed the Add Event screen, we add a button block and add two buttons, one for Submit and one for Cancel.
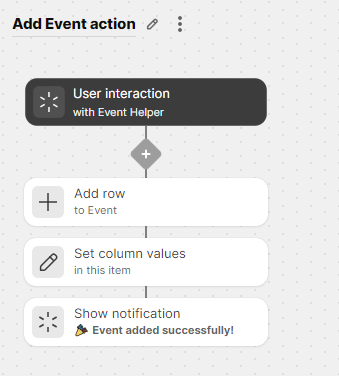
We define a new action and call that on click of Submit button. I named this action Add Event action. In order to define the same, go to actions tab in the main screen to add the steps.
I added 3 steps:
Add a row to Event table
Clear the current column values to null in Event Helper table as it needs to be a single row table
Show a success notification message
It looks like 👇
- We choose Close Overlay on click on Cancel button.
Hooray 🤩 We've integrated Radar's Complete address functionality in our Glide app. If you want to see it in action, feel free to add Event in my Smart Events app.
Conclusion
Although it may seem like a lot of work on initial glance, it actually isn't if you follow the steps one by one. This is a tiny feature but improves the usability of any address column to a very great extent. Do give it a try! If you face any hiccups, feel free to post your questions. I'll be glad to be of help 😀
This is my last post for 2023 💥. Wishing you all a very Happy 2024, Let's read more, blog more, and build more in the next year⭐
References
In general, when it comes to Glide, I learn a lot from Robert Pettito